Our Nutshell

Navigating Life One Day At A Time

  • Home
  • Crafts & DIY
  • Our Home
  • Recipes
  • Everyday
  • About
  • Contact
You are here: Home / Crafts & DIY / Lego Birthday Cake Using Chocolate Mold Legos

Lego Birthday Cake Using Chocolate Mold Legos

February 16, 2014 Andrea

Lego Birthday Cake
Lego Birthday Cake

Our oldest son Aiden turned 10 last fall and he asked to have a lego cake.  I had seen a variety of really cool, professional looking cakes on Pinterest, but I’ll be the first to admit that I’m not exactly the most skilled cake decorator.  So we talked to a local baker but the cake would cost quite a bit, and the previous year we had gone all out on a “Cake Boss” style cake that we spent a lot on…and it ended up looking terrible (no refunds!).

Part of the fun honestly is making the cake and decorating it yourself and my son wanted to be able to decorate the cake as well.  We decided to create our own Lego cake never having made a cake this extreme before.

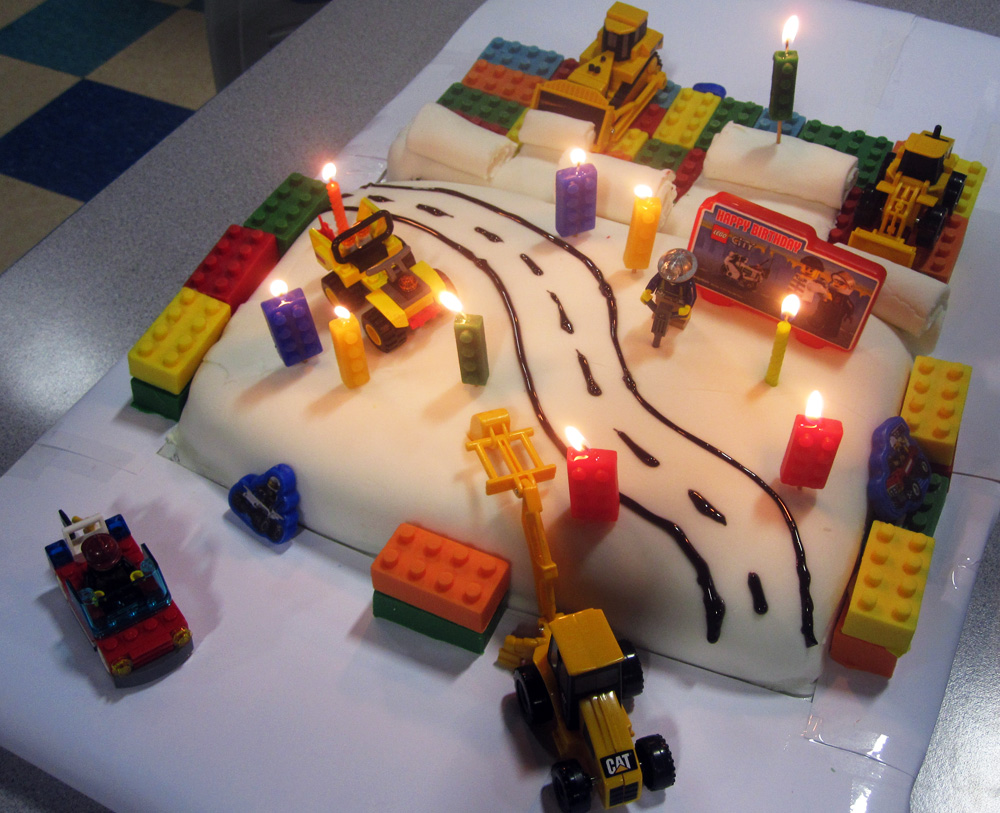
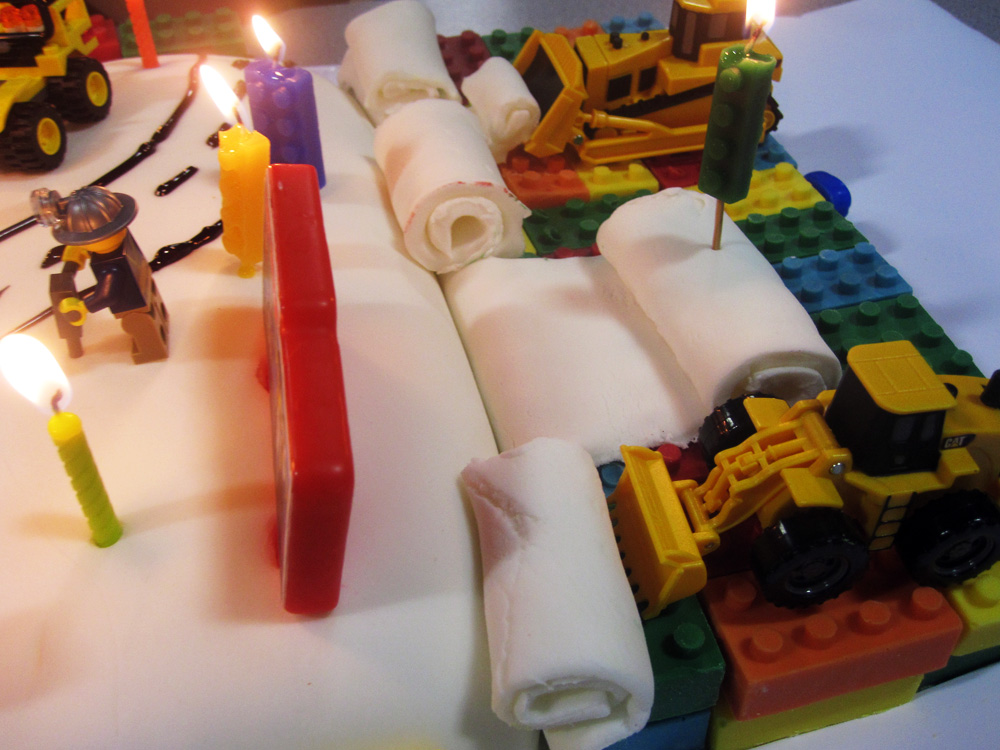
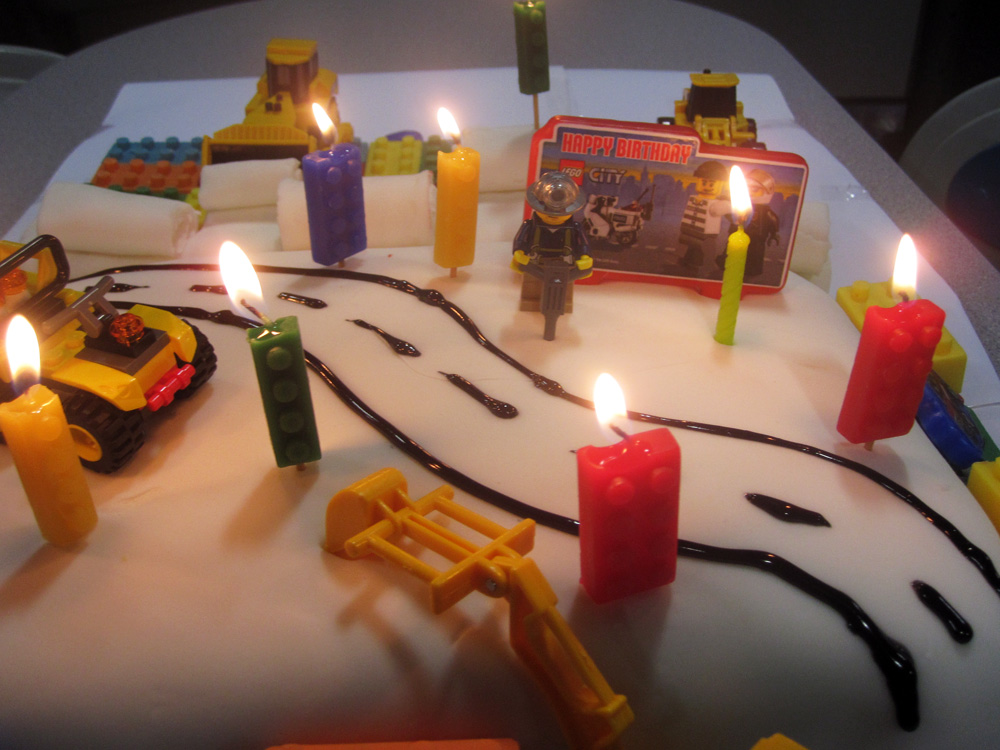
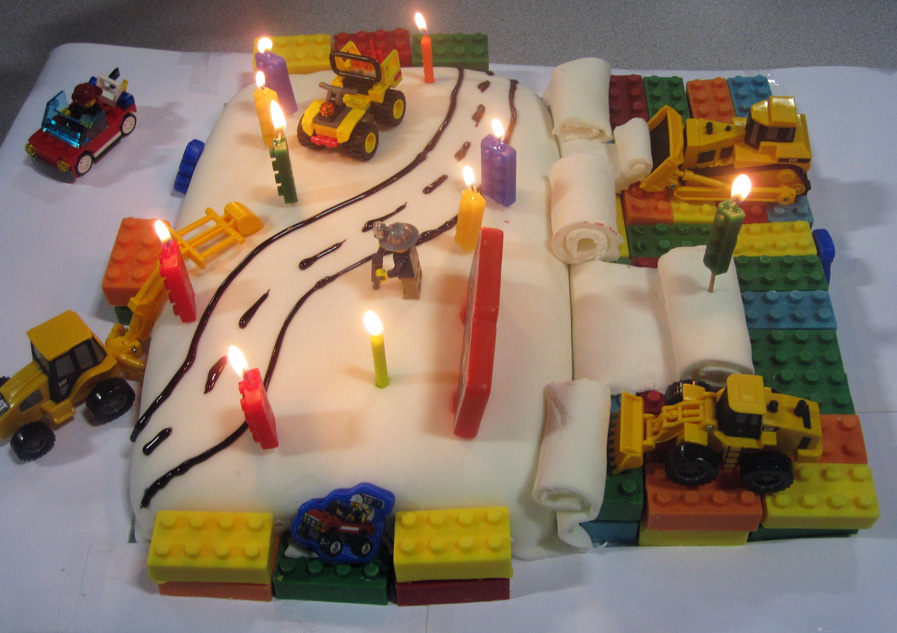
We made a regular sheet cake, and then covered it in a basic buttercreme frosting.  I purchased fondant from a local craft store and rolled it out over the cake and then cut and rolled extra pieces where the trucks would be “working” on the cake.

I purchased this Large Lego Brick Ice Cube Tray / Candy Mold (2 of them to make them quicker), which at first I was disappointed that it wasn’t true to “Lego” size, but after making about 50 of them I was grateful it was larger!  Also, there is no bottom rivets, so when you place a block ontop of another block, they don’t actually attach, but I found they looked really cool stacked on top of each other anyway.  For the bricks, I bought a bag of each color chocolate melting wafers that my son wanted, and melted them in the microwave and poured them into the molds, doing 1 color at a time until the chocolate for that color was gone.  The secret to the mold is to make sure the chocolate goes all the way into the bottom circles.  You can do this by grasping either side of the mold once filled and gently tapping the bottom against a tabletop.   You’ll notice air bubbles rise, this is good!  Once all air bubbles are gone, stick in the freezer to harden.  Make sure it’s completely cooled before popping them out.  If you don’t remove the air bubbles the little circles will be a mess!

We purchased a toy “construction vehicle” pack, and a few inexpensive Lego packs (the kind you see at checkout sometimes), as my son didn’t want to ruin his.  We then used coloring gel to draw the road, added all of the vehicles, and on the top added Lego Style Candles to finish it off.

I thought it turned out pretty good, we got quite a few compliments on it, and a few parents wanted to know how to make their own for their kids, that must be a good sign!

Disclosure: This post contains an affiliate link(s). Thank you for supporting Our Nutshell at no cost to you :)

Here are some additional pictures of the cake:

legocake2 legocake3 legocake4

Crafts & DIY lego birthday cake, lego cake, lego chocolate mold

  • Instagram
  • Pinterest
  • Twitter

About Andrea & Eric


Hi there!  We are stay-at-home, work-at-home parents of 4 active children who try to balance life while running a business from home.  Is your life chaotic? Do you find it hard to separate family, work, kids and time with loved ones? By sharing our experiences here, we hope you feel better knowing that you’re not alone.  We believe that life truly happens in the messy, unexpected, unplanned moments of everyday life.

Featured Posts

Entry Table Redo: From Craigslist to Entryway

Classic Blueberry Crisp

Our Modern Farmhouse Will Soon Be A Reality

Advertisement

Featured Recipes

Featured Posts

Handmade Christmas Cards Made From Glitter Scrapbook Paper

January 15, 2015 By Andrea

I decided to take on a pretty big project for Christmas - making and sending out my own handmade Christmas cards.  I was inspired by a story I read about a woman who created handmade cards every year up until her death and the year she passed away she started the cards.  Her daughter decided to take on the task and reminisced about how much people loved and looked forward to her mom's cards.  It was a really cute story, and although I doubt it's something I might ever even do again, it was fun … [Read More...]

More Posts from this Category

Recent Posts

  • Family Favorite Dinner – Sesame Orange Chicken
  • March 2020 Stay At Home Fun Guide & Calendar
  • The Perfect Gift For Bakers
  • Personalized Place cards for Thanksgiving or Christmas Dinner
  • What Do We Tell Our Children When Life Gets Difficult?

Tags

5 ingredients or less balancing rocks best Greek turkey burgers buffalo wings calming rock stacks cheddar cheese turkey soup cheese cheesy ground turkey pasta chicken wing recipe child fruit christmas cards christmas planter christmas tree branches crockpot easy buffalo wings easy chicken wings fruit for kids fun garlic buffalo wings glass glasses great baked chicken wings ham handmade christmas cards healthy food healthy foods healthy turkey burgers kid healthy eating Kinivo ZX100 mason jar mason jar glasses with handles mini portable speaker pasta planter potatoes rock balancing rock stacking rock tower snow day turkey burgers turkey cheeseburger soup turkey vegetable tray wedding Wegmans Greek burgers whole chicken wings

Social Icons

  • Instagram
  • Pinterest
  • Twitter

Search This Site

Copyright © 2025 · Daily Dish Pro Theme on Genesis Framework · WordPress · Log in

Disclaimer Policy